Saturday, June 28, 2025

Fanout for 0.5mm pitch BGAs

Fanout for 0.5mm pitch BGAs is a critical aspect of PCB design due to the tight spacing and high pin counts involved. Here's a breakdown of recommendations and key considerations:

1. Routing Strategy:

  • Via-in-Pad (VIP): This is often the preferred and sometimes necessary method for 0.5mm pitch BGAs, especially for inner rows.

    • How it works: Vias are placed directly within the BGA pads. This maximizes routing space between pads on the same layer.

    • Advantages: Allows for more traces per layer, enabling higher density designs and potentially reducing the total layer count. It's excellent for high-speed signals as it minimizes stub length.

    • Disadvantages: Adds complexity and cost to manufacturing (requires filled and planarized vias to prevent solder wicking).

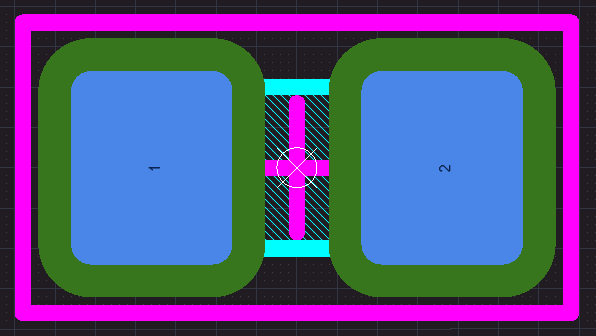
  • Dog-bone Routing (Trace to Via): While often used for larger pitches, it can be challenging for 0.5mm pitch.

    • How it works: A short trace connects the BGA pad to a via placed adjacent to the pad.

    • Challenges for 0.5mm: The space between pads is very limited, making it difficult to fit a trace and a via with sufficient clearance. You might only be able to route one trace between pads, limiting fanout density.

  • Routing between pads: For 0.5mm pitch, routing a trace between two adjacent BGA pads on the same layer is possible but very tight. This typically requires very fine trace widths and spacing (e.g., 3 mil trace/3 mil space). This method is usually limited to the outermost rows.

2. Layer Count:

  • Increased Layers: 0.5mm pitch BGAs often necessitate a higher layer count PCB to break out all signals.

  • Rule of thumb: Roughly one signal layer for every two rows of pins (on one side) is a common starting point, plus additional layers for power and ground.

  • HDI (High-Density Interconnect): For complex 0.5mm pitch BGAs, HDI technology (using microvias, blind vias, and buried vias) is frequently required. This allows for more efficient routing in a smaller footprint.

3. Design Rules and Manufacturing Considerations:

  • Trace Width and Spacing:

    • Expect very fine trace widths (e.g., 2.5 mil to 4 mil, or 0.06mm to 0.1mm) and tight spacing (similar to trace width).

    • These values are highly dependent on your PCB manufacturer's capabilities and your impedance control requirements. Always consult with your chosen fab house early in the design process to understand their minimums and optimal parameters.

  • Via Size:

    • Microvias: For via-in-pad, microvias (laser-drilled, typically spanning only two layers) are ideal.

    • Drill Size: The drill size for vias will be very small. For through-hole vias, a common minimum drill size is around 6 mil, but microvias can be much smaller.

  • Pad Size:

    • Non-Solder Mask Defined (NSMD) pads are generally recommended for BGAs as they provide better solder joint reliability. The copper pad is smaller than the solder mask opening.

    • The copper pad diameter is often around 80% of the BGA ball size.

  • Power and Ground: Dedicate sufficient power and ground planes to ensure stable power delivery and minimize noise, especially with high-speed signals. Decoupling capacitors should be placed as close to the BGA pins as possible.

  • Impedance Control: For high-speed signals, controlled impedance traces are crucial. This requires careful calculation of trace width, spacing, and dielectric thickness in your PCB stack-up.

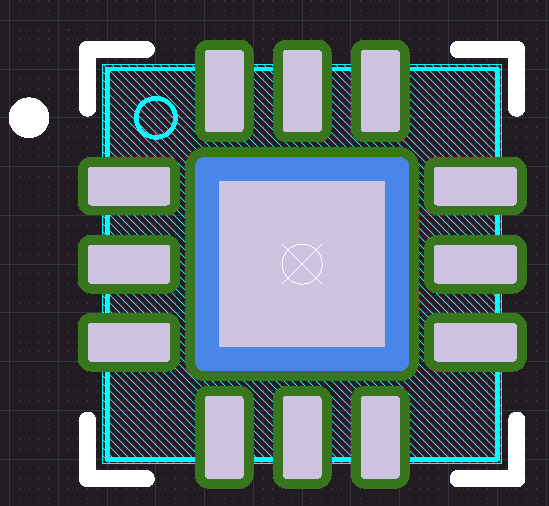
4. Fanout Strategies for Different Rows:

  • Outer Rows: The outermost one or two rows might be fanout using dog-bone style or by routing a single trace between pads on the top layer.

  • Inner Rows: For inner rows, via-in-pad is almost always necessary to escape the signals efficiently. You might also use blind and buried vias to connect to internal layers without consuming space on outer layers.

5. Communication with Manufacturer:

  • Crucial: Before you finalize your design, always consult with your PCB manufacturer. Share your BGA specifications, desired layer count, and preliminary design rules. They can provide specific DFM (Design for Manufacturability) guidelines, cost implications, and confirm their capabilities for your chosen trace widths, spacing, and via technologies. This proactive approach can save significant time and money by avoiding design revisions or manufacturing issues.

In summary, 0.5mm pitch BGA fanout requires a thoughtful approach, often leveraging advanced PCB technologies like HDI and via-in-pad, along with strict adherence to design rules and close collaboration with your manufacturing partner.

Thursday, June 27, 2024

Panasonic - Alivh

Panasonic Develops Mass Production Technology for ALIVH-F Resin Circuit Board Using Polyimide Film

Tuesday, June 4, 2024

Microvia Copper Fill Process

Microvia copper fill is a technique used in high-density interconnect (HDI) PCBs to create reliable electrical connections between different layers. Here's a breakdown of the process:

Why copper fill?

  • Improved Conductivity: Solid copper offers superior conductivity compared to alternative via plugging materials like epoxy resins. This translates to better signal transmission.
  • Higher Reliability: Copper filled vias are less prone to cracking or delamination during thermal stress, enhancing the overall reliability of the PCB.
  • Manufacturing Efficiency: Copper plating is a well-established process in PCB fabrication, allowing for efficient integration into the existing workflow.

The Copper Filling Process:

  1. Preparation: The drilled microvias are cleaned and prepared for electroplating to ensure proper adhesion of the copper.
  2. Electroplating: The PCB panel is placed in a plating tank containing a copper sulfate solution. An electric current is applied, causing copper ions to be deposited on the via walls and gradually fill the microvia.
  3. Additives and Techniques: Special additives might be used in the solution to achieve conformal plating, ensuring complete filling and minimizing voids within the via. Techniques like horizontal or vertical plating equipment may be used depending on the via aspect ratio.
  4. Resin Filling (Optional): After copper plating, some manufacturers might fill any remaining voids with conductive or non-conductive epoxy resin for additional stability.
  5. Planarization: The PCB surface is polished to ensure a smooth and even finish.

Advantages of Copper Filled Microvias:

  • Increased packing density of electrical connections in the PCB.
  • Improved signal integrity due to superior conductivity.
  • Enhanced reliability through robust via connections.
  • Compatibility with existing PCB fabrication techniques.

Things to Consider:

  • Copper filling process adds complexity to PCB manufacturing, potentially affecting cost.
  • Microvia dimensions play a crucial role in achieving complete and void-free copper filling.

If you're designing HDI PCBs and require high-density, reliable connections, copper filled microvias are a strong option. However, discussing the design and feasibility with your PCB manufacturer is recommended.

Sunday, May 5, 2024

Footprints - Common Mistakes

 Problem - Paste Stencils should NOT have inside corners

Solution - All openings in the paste stencil must have outside corners.

Problem - Silkscreen lines along sides of chip Resistors, Capacitors and Inductors will interfere with aqueous cleaning processes.

Solution - Remove silkscreen as shown below to allow aqueous cleaning processes to remove flux residues under chip Resistors, Capacitors and Inductors.

Problem - Silkscreen  under or too close to the edge of Bottom Terminal Components.

Why ?  Silkscreen registration accuracy is typically plus or minis 5mils.

Analogy:

Think about speed bumps or undulations in a parking lot or in roads near schools. 

Silkscreen will be the tallest feature on the outer layers of the PCB.  

These raised silkscreen lines under or near the edge of the component can cause soldering yield problems especally for small fine pitched Bottom Terminal Components (BTC).

Solution -  Keep silkscreen lines 5mils away from the edges of all Bottom Terminated Components, ie, QFNs and DFNs,


Problem - Excess solder paste on BTC pads.


Why ? Excess solder will form a raised pillow and the part will teeter totter during reflow.

The part can end up having shorted pads (solder bridges) on one side or open connections.

Solution -  Reduce solder paste volume, to 50% to 60% of the pad's area.

Example - Tiny QFN 

Example - Small DFN


Example - Small QFN with Windowed Paste


Problem - LEDs and Diodes - Pin1 should be the Cathode (K)

Example - Wrong !  Pin 2 was assigned to the Cathode.

Example - Kingbright P/N APTD1608CGCK

Note Cathode (K) is Pin 1 and Anode (A) is Pin 2

Solution - The Cathode should be assigned to Pin 1.

That's it !

Saturday, April 27, 2024

High-Speed Interface Layout Guidelines - TI

High-Speed Interface Layout Guidelines (Rev. J) - Texas Instruments

Per Gemini - Google AI

There are actually two main reasons why differential signals are not always preferred for routing on the outer layers of a printed circuit board (PCB), and it has to do with the type of transmission line formed:

Microstrip vs. Stripline:

Outer layers create microstrip transmission lines, where the signal trace has a reference plane on one side (usually a power plane) and air on the other.

Differential signals rely on a consistent and symmetrical environment for optimal performance. Microstrip, due to its air exposure, introduces an asymmetry that can affect the common-mode vs. differential-mode propagation characteristics.

Controlled Impedance:

Precise control over the impedance of the transmission line is crucial for high-speed differential signals. Microstrip's impedance is more sensitive to variations in manufacturing tolerances compared to stripline.

However, there are some advantages to routing differential signals on outer layers:

Slightly Faster Signal Propagation:

Outer layers have a lower effective dielectric constant due to the presence of air. This can lead to marginally faster signal travel compared to inner layer routing.

Easier Access for Controlled-Impedance Routing Techniques:

The outer layers are more accessible for adding solder masks or prepreg layers to adjust the trace width and spacing, allowing for finer control over impedance.

In conclusion, the decision to route differential signals on outer layers depends on the specific application's priorities. For high-performance applications where signal integrity is paramount, stripline routing on inner layers with a controlled and symmetrical environment is usually preferred. However, for lower-speed applications where manufacturability and ease of access are important, outer layer routing with microstrip can be a viable option, considering the trade-offs mentioned above.

That's it !